So in part 1 I talked about the basics and how you can “green screen” for very little money…and then in part 2, a couple of ways you could superimpose multiple “green screen” or “chroma key” elements on top of each other. In part 3, we’re going to kick it up yet another notch, and show how you can use your nonlinear editing software to layer video clips, backgrounds and stills, using chroma keying techniques, to make people ask, “How’d they do that???”
To get started, take a look at this short video clip and take note of all the different elements:
How was it done? Let’s take it one element at a time. Starting from the farthest back (or the bottom video clip in your NLE timeline), the video contains:
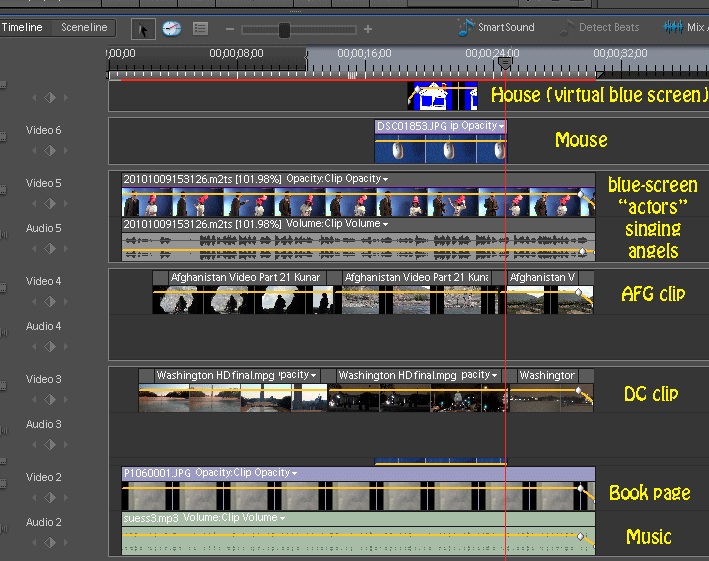
– a still photograph of a blank page from a book. After all, this is a parody of a book!
– two additional, separate video clips (Washington, D. C. and Afghanistan). These simply become the next higher video clips in your timeline. In Adobe Premiere Elements and most others, you can resize these clips by dragging their corners so they look like they have been projected onto the page. Add a couple of transitions and synch their appearance and disappearance to the rest of the action.
– the two live action characters are next. These were filmed in front of a blue screen using the techniques described in earlier posts. Make sure you know your script so you know where, and when, to point at the blank cloth behind you!
– Later, the computer mouse appears. This was simply a photograph against the blue backdrop (we suspended it by a piece of fishing line. If you use a still, you can simply “cut out” the object using Photoshop – but if you want the object to rotate in mid-air, you can also use video and chroma-key. Resize the object just like the video clips. Now you have to do the hardest part – synch it to the moving hands in the clip. This employs a tool called “keyframes.” You indicate where you want the object to start – in this case it was off-screen – and you establish a “keyframe” which tells your software that, at a particular frame, this is the location you want the item to appear. Then you move forward a few frames at a time and move the object to its new location, and add another keyframe, until the action is complete. Your software should “fill in the blanks” between keyframes. Not only can location be adjusted this way, but also size – like when the distance between our hands changed. This can take some time and experimentation to get right. In addition, my NLE software has a “16-point matte” tool which allows you to establish a kind of “matte” around the object to screen out additional areas as needed. This was done to hide small parts of the mouse in the area of our hands, to suggest that our fingers were covering small parts of the mouse.
– Finally, I added the house. I chose to “re-draw” the house from the Dr. Seuss book, with two windows instead of one. You can also use a scanner, and then work with Photoshop. The key element is that you must create a kind of “virtual” green (or blue) screen. Choose a color that is farthest from the other colors in the drawing, and color everything you do NOT want showing that color. So for the mouse, you might use red or orange; while for the house, you could use blue or lime green, for example. This includes the windows of the house, to make them transparent. Now I simply made the house enter the scene using keyframes (see above) and then added a transition at the right place to make it “explode.”
Below is a screen shot showing how everything is laid out on the timeline:

Now, granted – there are probably more sophisticated ways of doing something like this; but I hope you’ve enjoyed the extremely easy and inexpensive way I did it – and you can do it too. Actually filming and editing this video took one full day. Well, except the Afghanistan part – that took 6 months!
If you know of ways to improve on this approach, I’d be happy to hear about it.
