In August 2017, the hosts of podcast Against the Grain discussed photographers’ tendency to immediately look at photos they’ve shot (chimping) and how film photography slows the process down, resulting in an increased emphasis on capturing the photo, without constantly worrying about the end result. They suggested taking this idea of removing “chimping” to an extreme by putting a complete hold on film development for a year. Not necessarily stopping all film photography, but maybe one type of film, one camera, one shot per month or roll per month for the project – whatever the listener might come up with.
This sounded like a fun project to me. In my variation of this project, I would exclusively use Kodak Tri-X 400, but every month, I would shoot a roll with a camera from a different decade. I knew I had enough cameras to be able to shoot with one camera every month, from the 1890s to the 2000s, which works out to exactly 12 months. Each month, the roll would go into the freezer, and I’d develop the whole pile in September, 2018. You can read about the project proposal in more detail here.
Here is the pile of film I took out of my freezer at the beginning of September:

It’s been a pretty busy month, but I’ve finally managed to develop, scan and curate each roll. I describe my results below. For each month, I initially provide the thoughts I had before shooting (i.e., the camera description and maybe why I chose that camera). This is followed by my four favorite shots of each month and a comment about the results.
September 2017: 1890s – Rochester Camera Company “Cycle Poco”
 The Cycle Poco is my oldest camera, having been manufactured somewhere between 1897 and 1903. It’s a brass and mahogany thing of beauty hidden inside a pretty unremarkable, beaten-up black box. Before this project I had only taken two photos with it, and it took some time to re-learn its peculiarities, such as its tendency for the sheet film to fall into the camera and get stuck there (and ruined) when I put the slide cover back into the holder. I used Tri-X 320 and probably ruined at least 4 of the 10 sheets, but the rest are stored in the freezer. I also, on a lark, checked eBay and found a leather case and 4 additional film holders – meaning I can now take a total of 10 photos (2 per holder) per outing, rather than the two to which I was originally limited.
The result:

Given the time and expense it took to shoot photos in the 1890s, I’m surprised it caught on! As hinted in the intro, I expected most would not turn out, and I was correct – only three of these four were properly in focus. I kind of like the one at bottom left, with the kid in mid-air, jumping from the bridge when school was cancelled due to the plague outbreak in Madagascar!
October 2017: 1900s – Kodak No. 3A Folding Hawk-Eye Model 1 and the Kodak No. 3A Folding Pocket Kodak Model B-4.
 So I basically cheated this month and used two cameras – but this is because both cameras are untested and there is always a chance they don’t actually work. I had considered a pair of No. 1A Folding Pocket Kodaks but neither shutter was working properly, even though they both used to work fine. The Hawk-Eye is kind of a mystery, because I had previously catalogued it as a No. 1A Folding Hawk-Eye, but it seems I was wrong. It looks like a 3A, but it uses 116 film like the 1A instead of 122 film like the 3A. And strangely, has an aperture setting but no shutter speed setting. It’s missing the leatherette on the front but appears to be in working condition. So in the end I don’t really know the model number, but there’s enough evidence to be fairly certain it’s a 1905-ish era camera.
Addendum: It’s a No. 1A Folding Hawk-Eye, Model 1. It says so on the metal plate below the lens/shutter. It was manufactured between 1908 and 1912.
 The problem with these early cameras is that they were manufactured at a time when ISO 50 film was the norm. So with ISO 400 film on a bright sunny day you’d have to choose apertures like f/64 or f/128 (which the camera has) but my iPhone light meter app simply doesn’t go that high. So you have to either wait for a cloudy day or shoot as the sun is starting to set – about a 20-minute window. So a lot of this light metering using Tri-X 400 is going to be guesswork, but I am optimistic about the outcome, as long as there aren’t any hidden bellows holes.
The results:
Kodak 3A Folding Hawk-Eye Model 1:

For this camera I got 4 shots total but I’m only sharing one. The main problem with using 120 film in a camera that’s designed to take pictures much wider than 120 film is that you forget to take into account the part that will go missing. So the photo that turned out somewhat usable was the inadvertent panorama. There should have been more at the top and bottom but in spite of this, I think it turned out OK.
Kodak No. 3A Folding Pocket Kodak No. B-4:

I was really pleased with the results of this camera. I’m not sure where the light leak came from (there are two such exposures but I’m only sharing one) but this is a camera from the 1900s that lets you choose shutter speeds of 1/25, 1/50 and 1/100 second, and set apertures from f/4 to f/128; and you focus by moving the lens forward and backward. And after more than a century, it seems that everything still works!
November 2017: 1910s – Kodak No. 0 Kodak Brownie
 I thought this month it was time to try something simpler. The Kodak Number 0 is a humble little wood-and-cardboard box camera that sold for a buck and a quarter during the first world war and it uses 127 film. To be able to stick with Kodak Tri-X film, I had to cut down a roll of 120. It’s always a tight fit because the 120 roll has more film and paper; and it seems I lost the first few exposures because the numbers don’t line up with the little window. Let’s see what kind of pictures we can coax from it.
Results:

This is not the first time I’ve made this mistake. The numbers on the back of 120 film are printed to line up with the openings on the back of the camera, depending on the type of camera you’re using – some take bigger exposures than others. Many cameras that use 127 film take square pictures, and I have generally had good luck with those. But in this case we have a camera that takes 6cm by 4cm photos but the numbers that showed up in the window were for square photos. So all the photos overlap each other. Ultimately, I think some of the effects and combinations happen to be interesting, but I don’t take credit when it was by accident.
 December 2017: 1920s – No. 1A Autographic Kodak Junior
This month, I’m taking a risk – I’m using a camera that is completely untested – at least in my hands. It’s also not 100% certain to have been manufactured in the ’20s – I’ve narrowed it down to 1915-1925. Close enough, I guess.
I’ve spooled a roll of Tri-X 120 into a 116 backing paper – so a couple of mm will be missing top and bottom (or sides), but otherwise let’s hope for the best! I’ll be using it without the cable release.
Results:

These are photos from the hill overlooking downtown Antananarivo. I was hopeful the shot of the boy would turn out well and am pleased it did. I somewhat sneakily took it sideways and shot from the hip. From the standpoint of modern photography, these pictures aren’t any good, but I don’t think they’re all that bad either. Hey, it’s 1920s tech.
 January 2018: 1930s – Kodak Six-20 Model C
For January I’ll be shooting with another untested camera – in addition one that has a few pinhole leaks in the bellows. I think I have them all sealed up with electrician’s tape.
This camera, from 1932, is supposedly the one which, along with the Six-16, Kodak introduced to start using 620 and 616 film. So I’ll be respooling the Tri-X onto a 620 spool. Easy stuff.
Results:

….aaand clearly that tape I put on the bellows didn’t fix the problem. Although I’m not entirely convinced the problems with these photos is due to light leaks – normally I’d expect bright streaks rather than dark bands. Disappointing. But it may be worth trying once again, but with color film, just to help diagnose what’s wrong with the camera…and to see what kind of results I’d get!
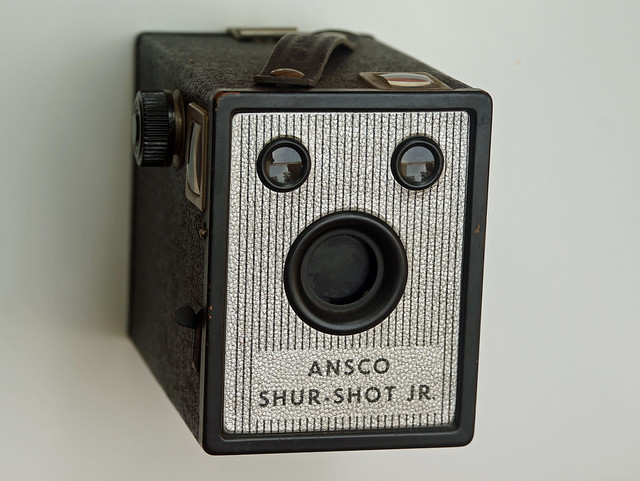 February 2018: 1940s – Ansco Shur-Shot. Falling a bit behind here, but there are only 8 frames on a roll of the 120 film that will go in this box camera. I’ve taken photos with it before and they turned out pretty well, so I’m hopeful this will also yield some nice results.
Results: For a 1940s box camera, the results were pretty good. But given the results I’ve gotten from this camera previously, they could have been better. For some reason, the long edges of the film were all much darker than the center; I had to play around with photoshop a bit to make the pictures workable.

I like these street scenes from Antananarivo. In case it’s not clear, the people in the third photo are reading posted newspaper pages, a common sight in the city. I wish the results had been a bit less “muddy,” given it was a clear, sunny day.
March 2018: 1950s – Kodak Signet 35. 
The Kodak Signet 35 was Kodak’s top American-made 35mm camera of the 1950’s and the first of the Kodak Signet camera line. The Signet 35 originally sold for $95 USD (app. $810 USD in 2007). The design was by Arthur H Crapsey, and it was made between February 1951 – March 1958.
I have managed to get some good images from this camera on previous efforts, but have not yet done a full review as I usually do. The results I’ve gotten prior to this project can be seen here.
Results:
 To get these shots, I spent a few hours in the morning walking around town while my car’s radiator was being repaired (yes, that’s a thing where I live!). This was the first month I was shooting a film format that offers more than 8 or 12 exposures. So most of the photos were crap – disappointing for this particular camera, of which I expected better – but I did find four – or five or six – that I thought came out pretty well.
All my photos after this point suffer from a kind of “sprocket shadow” along one edge. At first, I thought this was due to the film being curled lengthwise and not sitting flat in the holder. But eventually I realized the marks were on the film itself. I used HC110 (B) for all this film – in fact, the same batch for everything – and given that the problem showed up in different cameras, the best I can figure from consulting the online forums is that I was over-agitating, and somehow more developer was getting sucked in through the sprocket holes. If anyone has other idea, I’d be happy to know.
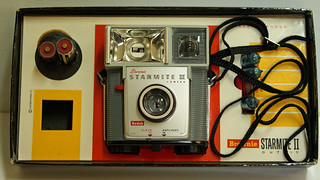 April 2018: 1960s – The Kodak Starmite II. I bought an “outfit” on eBay that appeared to be virtually unused, with 3 of the 4 bulbs that came with the camera unused, the camera still in the box and in pristine condition, so it should work. This is a fun little plastic cameras that, with its look and name, embodies the 60s for me.
Results:

I’m actually kind of disappointed by these results. This could literally be the second or third roll of film through this camera, judging by its condition and the packaging, and the film is top of the line. I feel like the results should be better. Literally the most interesting shot is the one from the beginning of the roll that was an accidental partial double exposure, followed by the shot that was underexposed and out of focus. Oh well. I did catch those guys pushing the car up the hill and the standard Antananarivo skyline that I didn’t realize I was taking on almost every roll.
 May 2018: 1970s – The Canon FTb, from the early 1970s, is a nice SLR from which I have gotten great results – some of my favorite photos – even if the Kalimar 80-200mm lens I have attached (the only compatible lens I own) isn’t quite stellar quality. The exposure meter on the camera doesn’t work, and if I remember correctly, I have to compensate for the length of the lens by allowing more light into the camera than you’d normally need. We’ll see what happens!
 A bit surprised that this film turned out as grainy as it did. With the long lens, I compensated a bit for the decreased light getting through (the light meter doesn’t work and I’ve had problems before) and it was a bright sunny day. I kind of like the photos, but I’m still surprised and I think they could have been better.
I’ve bought a new lens – not that expensive, but shorter – and I hope to get better photos in the future using this lens, from a camera that ought to do better than this.
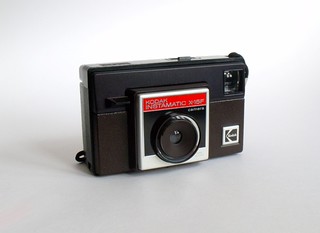 June 2018 – 1980s – For the 1980s, I’ve chosen the humble Kodak Instamatic X-15F. The X-15F was the final model in a long line of Kodak Instamatics manufactured in the 1960s, 70s, and 80s to accept the 126 cartridge. Nearly all of them are simple, cheap (made from plastic) and have simple, low quality lenses. I believe they take square pictures (24mm by 24mm?) but we’ll see what comes out! I believe this may be the only 1980s-era camera I own, so I’ll need to figure out how to respool 35mm film into a 126 cartridge. I know it’s possible and that other people have done it, but for some reason I have never managed to get it right and I always give up when it goes wrong. We do know this particular camera probably works, because when it arrived via eBay, it had a roll of pictures inside it, which I developed.
 The X-15F is a close cousin of the very first camera I owned, and thus I was especially hopeful this roll of film would turn out well. When I pulled it out of the camera to spool it for the developer, I noticed that a lot of the film was still on the wrong side of the camera and I was afraid the roll had failed – but happily I ended up with 5 decent exposures. This is also the first time I successfully spooled 35mm film into a re-used 126 cartridge and used that to shoot photos, so this was pretty exciting.
Given this is a cheap lens in a plastic camera, I’m very happy with these photos, though I am surprised they weren’t 24mm by 36mm exposures, but instead (almost) square exposures that extended onto the area used by the sprocket holes. In retrospect, this makes sense, because 126 film has the occasional sprocket hole but only on one edge of the film.
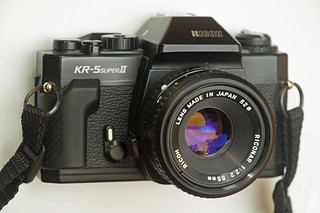 July 2018 – 1990s – The Ricoh Kr-5 Super II (what a mouthful!) is one of my favorite cameras for producing reliable results. Everything is manual but the light meter works and it’s easy to focus through the lens. It was introduced in 1993 and is great for students of film photography. Here some of the many photos I’ve taken with this one.
Results:
 This Ricoh is one of my favorite camera, and is generally very reliable. Unfortunately, when I set out to take this roll I discovered that the battery seemed to be empty, meaning the light meter would not work. I did the best I could using an iPhone app and adjusting from there on the fly. Many of my photos ended up too dark and grainy, but fortunately on a roll of 36 I was able to get a variety of decent shots.
 August 2018 – 2000s – Nikon F100. Made between 1999 and 2007, the F100 is not only my only film camera made in the current century, but also my go-to camera these days. According to the Fstoppers website, “the F100 was Nikon’s state-of-the-art prosumer / high end 35mm camera, falling just under the professional F5. The F100 was, at the time, one of the best featured cameras ever made and still remains the 135 camera of choice for film enthusiasts, wedding photographers, and many fine artists.”
Results:
 Brickmaking in Madagascar is always a fun subject for Tri-X film photography, due to the patterns and grit you get with this particular film. If you’re wondering what you’re looking at at top left, it’s a kind of pad someone has made (and subsequently discarded) which allows them to carry piles of 10-12 bricks on the tops of their heads without hurting their heads and without the bricks falling off. They’ve wrapped it with rags to make the surface softer.
What Did I Learn?
To be honest, I don’t think I learned anything related to the original intent of the project. I think the nature of film photography and the fact that shooting and seeing your results are naturally separated by hours, at a minimum, already does the trick of isolating shooting from “chimping” and the additional months to a full year don’t really change this.
I did enjoy choosing a different camera from a different decade every month and seeing the results of 120 years of cameras, using the exact same film, was pretty interesting. But developing this many rolls / sets of film, and subsequently scanning and adjusting all of the exposures was a big and tedious job. Did waiting a year add that much?
I’d say that this particular project shares a lot in common with many other 365/52 weeks type photography projects: sometimes you get in a rush to keep with the schedule, and you end up rushing your shots in such a way that you’re not necessarily doing your best work in terms of finding interesting subjects and light. Generally, I kept up with the month-by-month timing, but sometimes I fell behind and was more focused on finishing the roll than capturing good shots. To be frank, this is a bigger detractor from the process than chimping would have been.
Regardless, I thank the folks at Against the Grain for inspiring me to take on this project, and I hope the writeup ends up being of interest to a few folks out there.