A few months ago, I’d never heard of “Aerochrome” film. What is aerochrome? According to Kodak, “KODAK AEROCHROME III Infrared Film 1443 is an infrared-sensitive, false-color reversal film intended for various aerial photographic applications where infrared discriminations may yield practical results.” It was discontinued in 2010 and the last bit of it expired in 2011.
I heard about it from an article on Emulsive.com. He (“Em”) was so enthusiastic about this film, and it was such a curious story – apparently a fellow named Dean Bennici took it upon himself to rescue and re-roll and/or recut all the remaining Aerochrome in existence – that I decided to do a bit more digging to see whether I could find some of this odd film.
I found my answer on eBay, where this Bennici fellow apparently sells the film himself. I was a bit wary; $38 for a roll of 120 film (plus shipping from Europe) was pretty steep, and I started poking around on the internet to see what other people had to say about the stuff. It turns out there are all sorts of warnings and pitfalls out there – some people insist that the film has to be stored at sub-freezing temperatures (apparently the tech specs state this) or it will be instantly ruined. Others warn that all the containers it could possibly be stored in are somehow porous to infrared light, and thus the film will become hopelessly fogged unless you keep it in the equivalent of a lead-lined underground bunker.
Given that I planned to order the stuff from Madagascar, meaning it would be shipped international post from Europe to the United States, and then halfway around the world again to me, I figured my odds of receiving any usable film were pretty slim. So I sent a note to Dean Bennici on eBay, who assured me that he had been shipping this film all over the world for some time, and I had little to worry about. So I ordered two rolls.
So what’s so special about this film? Well, it’s a bit experimental and fun. Apparently anything living and green reflects infrared light from the sunlight hitting it, causing the greenery to appear bright red (or pink) on the film. What’s the point of that, you ask? Not really much point, I guess – it’s just for fun. You can get pictures that are otherwise not achievable using photoshop or other techniques. Otherworldly stuff. Like this:
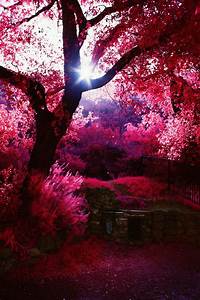
(borrowed, for illustration purposes, from thephoblographer.com.)
Admittedly, not everyone’s cup of tea. But then again, neither is film photography, in general.
It seems that in addition, to make the effect work properly, you need a yellow or orange filter. Which I did not have. Fortunately, I managed to find a yellow filter for my Rolleiflex 2.8c on eBay for around 20 bucks. So I ordered that too. Once the film arrived two weeks later, I did some more reading and discovered that unlike most color film available these days, it has a relatively narrow exposure range – meaning it’s easily under- or overexposed, ruining the overall effect. As a result, people suggest bracketing to ensure at least one good photo, but at 12 exposures per (expensive) roll, I decided to rely on my iPhone light meter and hope for the best, shooting 12 different shots rather than four bracketed shots.
One of the good things about Madagascar is that there’s lots and lots of vegetation. So plenty of places to use this film. I decided to bring it along with me as we travelled with our daughter throughout Madagascar. We went to Ile Ste-Marie, an island off the northeast coast, which meant the film would be exposed to x-rays yet again since a flight was involved, and also warm temperatures, because, well, that’s why people go to Ile Ste-Marie. So my odds of getting usable photos was continuing to decline. We also took it on a road trip to south-central Madagascar, past Ranomafana National Park and onward to Andringitra.
I ended up shooting both rolls while I was up there, and considered whether to try and develop the film myself – maybe one roll in C41 (essentially cross-processed) at home, and send the other roll off to be processed E6. In the end, I decided to entrust both rolls to the professionals at Blue Moon Camera in Oregon (USA), meaning my film faced yet another three weeks of travel, and additional x-ray machines.
By this point, I wasn’t holding out much hope for usable images, but I found out via their Facebook group that my film had arrived safely in Oregon, been developed and shipped back out, and that the staff there clearly remembered seeing usable images on the film! Just two more weeks, and the negatives finally arrived in Madagascar again.
Here are my favorite shots. It’s hard to narrow things down, given that they’re all so different from your “typical” Madagascar tourist photo. In fact, unlike most trips I’ve taken, I can say with a fair amount of certainty that no one has ever taken photos like these at these locations.
 Farmers tend to their rice fields in Madagascar. Most of the fields have just been plowed, and only the red indicates vegetation.
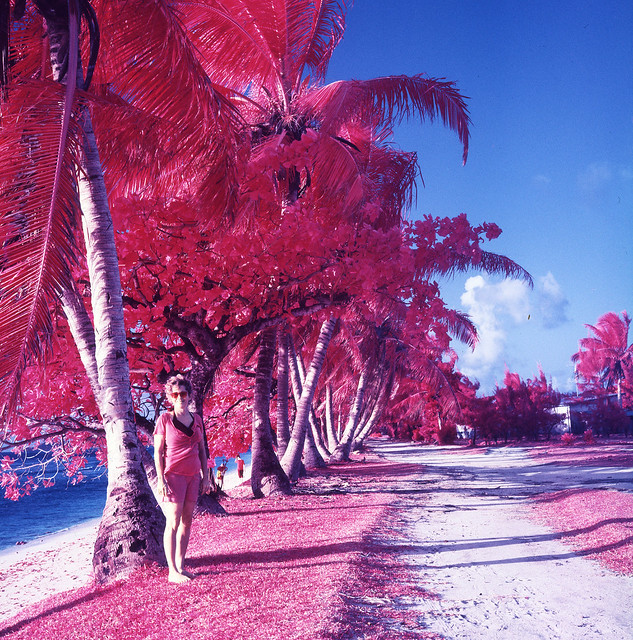
 View from Ile aux Nattes, a smaller island just off the southern tip of Ile Ste-Marie, which is east/northeast of Madagascar.
 From a viewing platform at Ranomafana National Park, in Madagascar.

 Near the airport of Ile Ste Marie, Madagscar.
 In a pirogue of the coast of Ile Ste Marie, Madagascar.
 Taken from the bridge entering Ranomafana National Park, one of Madagascar’s most visited.
Just for illustration purposes, here’s an example of what over- and underexposure look like when you’re using Aerochrome. I’ll admit I regret somewhat not having bracketed these, because they potentially could have been really good /interesting.
 Underexposed shot of “le Cameleon,” a mountain near Andringitra Park in southern Madagascar. On the top of the mountain a series of boulders look just like the namesake animal.
 Tomb markers in the rain forest from many hundreds of years ago.
Verdict: I’m glad I tried this film and agree with Emulsive that you simply need to try this at least once. It would be fun to continue experimenting with it, but given that each roll ended up costing about $60 (or $5 per photo – $10 if you consider that only half turned out) I’m not sure I’ll do this again. It might be fun to keep a roll in a camera just for those rare occasions where I might say, “This would make a good aerochrome shot” but I still worry frankly that the film would degrade over the 3 to 6 months it would likely take to get through a roll in that manner. So for the time being I’ll just admire all of the other aerochrome people have taken and put up on the net – there are plenty that have turned out much more interesting than mind.
For a couple of other examples of really interesting Aerochrome shots, try this post on Emulsive from a trip he took to Yucatan. Or check out this post, where Em interviews Dean Bennici himself, who has shot a couple thousand rolls of the stuff.
You can browse the complete two rolls I shot myself here on Flickr. If I ever try the stuff again, that’s where it’ll be posted.

Fascinating results! Looks like something from a Star Trek episode. “We’ve beamed down to this Class-M planet, Captain, and the foliage is all pink!”